# Environment Setup
## Summary
This environment setup guide will provide you with the necessary steps to get your development environment ready for building applications on the Hedera Network. You will set up a new project directory, establish a `.env` environment variable file to store your Hedera Testnet account ID and private keys and configure your Hedera Testnet client.
## Prerequisites
{% hint style="info" %}
***Note:** You can always check the "*[*Code Check ✅*](#code-check) *" section at the bottom of each page to view the entire code if you run into issues. You can also post your issue to the respective SDK channel in our Discord community* [*here*](http://hedera.com/discord) *or on the GitHub repository* [*here*](https://github.com/hashgraph/hedera-docs)*.*
{% endhint %}
## **Step 1: Create your project directory**
Open your IDE of choice and follow the below steps to create your new project directory.
{% tabs %}
{% tab title="Java" %}
Create a new Gradle project and name it `HederaExamples`. Add the following dependencies to your `build.gradle` file.
{% code title="build.gradle " %}
```gradle
dependencies {
implementation 'com.hedera.hashgraph:sdk:2.19.0'
implementation 'io.grpc:grpc-netty-shaded:1.46.0'
implementation 'io.github.cdimascio:dotenv-java:2.3.2'
implementation 'org.slf4j:slf4j-nop:2.0.3'
implementation 'com.google.code.gson:gson:2.8.8'
}
```
{% endcode %}
{% endtab %}
{% tab title="JavaScript" %}
Open your terminal and create a directory called *`hello-hedera-js-sdk`*. After you create the project directory navigate to the directory by running the following command:
```bash
mkdir hello-hedera-js-sdk && cd hello-hedera-js-sdk
```
Initialize a *`node.js`* project in this new directory by running the following command:
```bash
npm init -y
```
This is what your console should look like after running the command:
```bash
{
"name": "hello-hedera-js-sdk",
"version": "1.0.0",
"description": "",
"main": "index.js",
"scripts": {
"test": "echo \"Error: no test specified\" && exit 1"
},
"keywords": [],
"author": "",
"license": "ISC"
}
```
{% endtab %}
{% tab title="Go" %}
Open your terminal and create a project directory called something like `hedera-go-examples` to store your Go source code.
```bash
mkdir hedera-go-examples && cd hedera-go-examples
```
{% endtab %}
{% endtabs %}
## Step 2: Install Dependencies and SDKs
{% tabs %}
{% tab title="Java" %}
Create a new Java class and name it something like *`HederaExamples`*. Import the following classes to use in your example:
```java
import com.hedera.hashgraph.sdk.AccountId;
import com.hedera.hashgraph.sdk.Client;
import com.hedera.hashgraph.sdk.PrivateKey;
import io.github.cdimascio.dotenv.Dotenv;
import com.hedera.hashgraph.sdk.HederaPreCheckStatusException;
import com.hedera.hashgraph.sdk.HederaReceiptStatusException;
import com.hedera.hashgraph.sdk.TransactionResponse;
import com.hedera.hashgraph.sdk.TransferTransaction;
import com.hedera.hashgraph.sdk.PublicKey;
import com.hedera.hashgraph.sdk.AccountCreateTransaction;
import com.hedera.hashgraph.sdk.Hbar;
import com.hedera.hashgraph.sdk.AccountBalanceQuery;
import com.hedera.hashgraph.sdk.AccountBalance;
import java.util.concurrent.TimeoutException;
```
***Note:** You may install the latest version of the Java SDK* [*here*](https://github.com/hashgraph/hedera-sdk-java)*.*
{% endtab %}
{% tab title="JavaScript" %}
Install the [JavaScript SDK](https://github.com/hashgraph/hedera-sdk-js) with your favorite package manager *`npm`* or *`yarn`* by running the following command:
```bash
// Install Hedera's JS SDK with NPM
npm install --save @hashgraph/sdk
// Install with Yarn
yarn add @hashgraph/sdk
```
Install *`dotenv`* with your favorite package manager. This will allow our node environment to use your testnet ***account ID*** and the ***private key*** we will store in a *`.env`* file next.
```bash
// Install with NPM
npm install dotenv
// Install with Yarn
yarn add dotenv
```
Navigate to the project root directory and create a *`index.js`* file by running the following command:
```bash
touch index.js
```
Your project structure should look something like this:
%20\(1\)%20\(1\)%20\(1\)%20\(1\).png?alt=media)
{% endtab %}
{% tab title="Go" %}
Create a `hedera_examples.go` file in `hedera-go-examples` directory. You will write all of your code in this file.
{% hint style="info" %}
***Note:** Install the Go SDK* [*here*](https://github.com/hashgraph/hedera-sdk-go) *and the DotEnv package* [*here*](https://github.com/joho/godotenv) *before moving forward.*
{% endhint %}
Import the following packages to your `hedera_examples.go` file:
```go
package main
import (
"fmt"
"os"
"github.com/joho/godotenv"
"github.com/hashgraph/hedera-sdk-go/v2"
)
```
{% endtab %}
{% endtabs %}
{% hint style="info" %}
***Note:** Testnet **HBAR** is required for this next step. Please follow the instructions to create a Hedera account on the* [*portal*](https://docs.hedera.com/guides/getting-started/introduction) *before you move on to the next step.*
{% endhint %}
## Step 3: **Create your .env File**
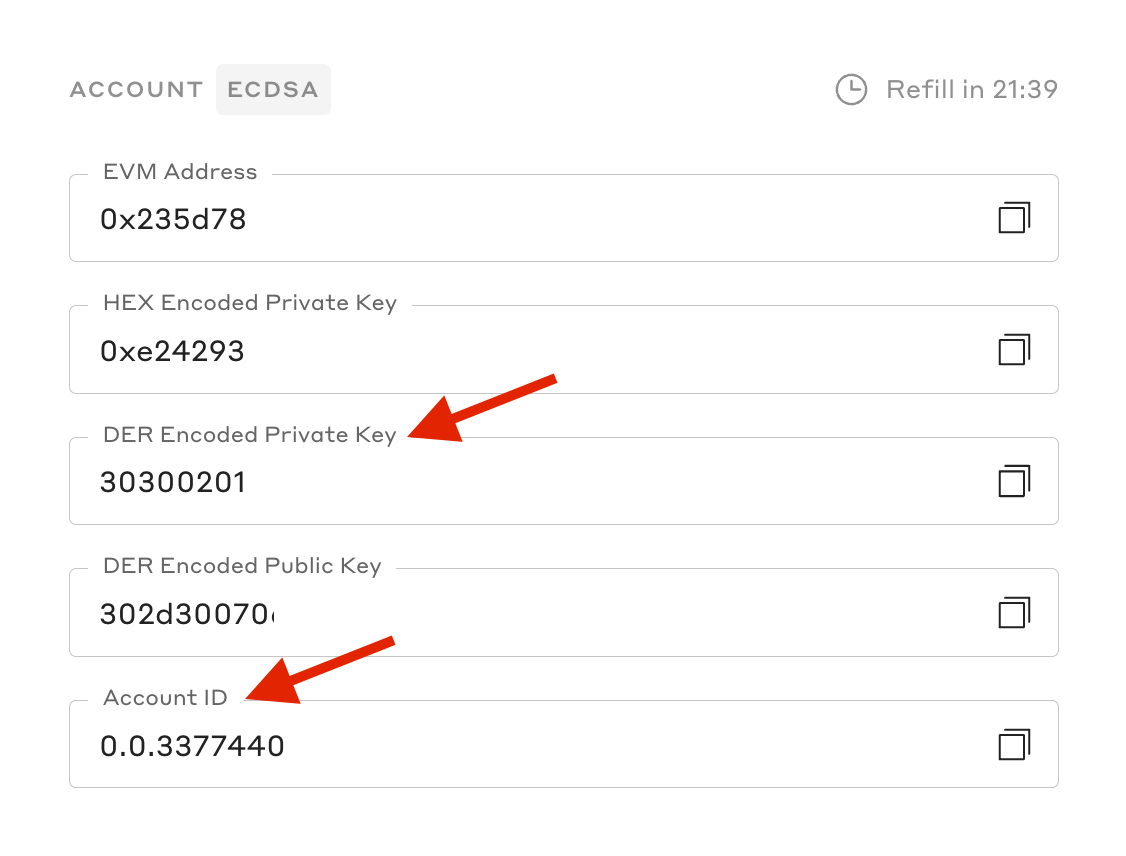
Create the `.env` file in your project's root directory. The `.env` file stores your environment variables, account ID, and private key (DER encoded).
```
MY_ACCOUNT_ID=ENTER TESTNET ACCOUNT ID
MY_PRIVATE_KEY=ENTER TESTNET PRIVATE KEY
```
Grab the Hedera Testnet account ID and DER-encoded private key from your [Hedera portal profile](https://portal.hedera.com/)(see screenshot below) and assign them to the `MY_ACCOUNT_ID` and `MY_PRIVATE_KEY` environment variables in your `.env` file:
Hedera Developer Portal
Next, you will load your account ID and private key variables from the `.env` file created in the previous step.
{% tabs %}
{% tab title="Java" %}
Within the *`main`* method, add your testnet account ID and private key from the environment file.
{% code title="HederaExamples.java" %}
```java
public class HederaExamples {
public static void main(String[] args) {
//Grab your Hedera Testnet account ID and private key
AccountId myAccountId = AccountId.fromString(Dotenv.load().get("MY_ACCOUNT_ID"));
PrivateKey myPrivateKey = PrivateKey.fromString(Dotenv.load().get("MY_PRIVATE_KEY"));
}
}
```
{% endcode %}
{% endtab %}
{% tab title="JavaScript" %}
{% code title="index.js" %}
```javascript
const { Client, PrivateKey, AccountCreateTransaction, AccountBalanceQuery, Hbar, TransferTransaction } = require("@hashgraph/sdk");
require('dotenv').config();
async function environmentSetup() {
//Grab your Hedera testnet account ID and private key from your .env file
const myAccountId = process.env.MY_ACCOUNT_ID;
const myPrivateKey = process.env.MY_PRIVATE_KEY;
// If we weren't able to grab it, we should throw a new error
if (!myAccountId || !myPrivateKey) {
throw new Error("Environment variables MY_ACCOUNT_ID and MY_PRIVATE_KEY must be present");
}
}
environmentSetup();
```
{% endcode %}
{% endtab %}
{% tab title="Go" %}
{% code title="hedera\_examples.go" %}
```go
func main() {
//Loads the .env file and throws an error if it cannot load the variables from that file correctly
err := godotenv.Load(".env")
if err != nil {
panic(fmt.Errorf("Unable to load environment variables from .env file. Error:\n%v\n", err))
}
//Grab your testnet account ID and private key from the .env file
myAccountId, err := hedera.AccountIDFromString(os.Getenv("MY_ACCOUNT_ID"))
if err != nil {
panic(err)
}
myPrivateKey, err := hedera.PrivateKeyFromString(os.Getenv("MY_PRIVATE_KEY"))
if err != nil {
panic(err)
}
//Print your testnet account ID and private key to the console to make sure there was no error
fmt.Printf("The account ID is = %v\n", myAccountId)
fmt.Printf("The private key is = %v\n", myPrivateKey)
}
```
{% endcode %}
In your terminal, enter the following command to create your `go.mod` file. This module is used for tracking dependencies and is required.
```go-module
go mod init hedera_examples.go
```
Run your code to see your testnet account ID and private key printed to the console.
```go-module
go run hedera_examples.go
```
{% endtab %}
{% endtabs %}
## Step 4: Create your Hedera Testnet client
Create a Hedera Testnet [client](https://dev.uniultra.xyz/docs/support-and-community/glossary#client) and set the operator information using the testnet account ID and private key for transaction and query fee authorization. The *operator* is the default account that will pay for the transaction and query fees in HBAR. You will need to sign the transaction or query with the private key of that account to authorize the payment. In this case, the operator ID is your testnet `account ID**.**` and the operator private key is the corresponding testnet account private key.
{% hint style="warning" %}
To avoid encountering the **`INSUFFICIENT_TX_FEE`** error while conducting transactions, you can adjust the maximum transaction fee limit through the **`.setDefaultMaxTransactionFee()`** method. Similarly, the maximum query payment can be adjusted using the **`.setDefaultMaxQueryPayment()`** method.
{% endhint %}
🚨 How to resolve the INSUFFIENT_TX_FEE error
To resolve this error, you must adjust the max transaction fee to a higher value suitable for your needs.
Here is a simple example addition to your code:
```javascript
const maxTransactionFee = new Hbar(XX); // replace XX with desired fee in Hbar
```
In this example, you can set `maxTransactionFee` to any value greater than 5 HBAR (or 500,000,000 tinybars) to avoid the "*INSUFFICIENT\_TX\_FEE*" error for transactions greater than 5 HBAR. Please replace `XX` with the desired value.
To implement this new max transaction fee, you use the `setDefaultMaxTransactionFee()` method as shown below:
```javascript
client.setDefaultMaxTransactionFee(maxTransactionFee);
```
{% tabs %}
{% tab title="Java" %}
```java
//Create your Hedera Testnet client
Client client = Client.forTestnet();
//Set your account as the client's operator
client.setOperator(myAccountId, myPrivateKey);
//Set the default maximum transaction fee (in Hbar)
client.setDefaultMaxTransactionFee(new Hbar(100));
//Set the maximum payment for queries (in Hbar)
client.setMaxQueryPayment(new Hbar(50));
```
{% endtab %}
{% tab title="JavaScript" %}
```javascript
//Create your Hedera Testnet client
const client = Client.forTestnet();
//Set your account as the client's operator
client.setOperator(myAccountId, myPrivateKey);
//Set the default maximum transaction fee (in Hbar)
client.setDefaultMaxTransactionFee(new Hbar(100));
//Set the maximum payment for queries (in Hbar)
client.setMaxQueryPayment(new Hbar(50));
```
{% endtab %}
{% tab title="Go" %}
```go
//Create your testnet client
client := hedera.ClientForTestnet()
client.SetOperator(myAccountId, myPrivateKey)
// Set default max transaction fee
client.SetDefaultMaxTransactionFee(hedera.HbarFrom(100, hedera.HbarUnits.Hbar))
// Set max query payment
client.SetDefaultMaxQueryPayment(hedera.HbarFrom(50, hedera.HbarUnits.Hbar))
```
{% endtab %}
{% endtabs %}
**Your project environment is now set up to submit transactions and queries to the Hedera test network successfully!**
Next, you will learn how to [create an account](https://dev.uniultra.xyz/docs/getting-started/create-an-account).
## Code Check :white\_check\_mark:
Java
import com.hedera.hashgraph.sdk.AccountId;
import com.hedera.hashgraph.sdk.Client;
import com.hedera.hashgraph.sdk.PrivateKey;
import io.github.cdimascio.dotenv.Dotenv;
import com.hedera.hashgraph.sdk.HederaPreCheckStatusException;
import com.hedera.hashgraph.sdk.HederaReceiptStatusException;
import com.hedera.hashgraph.sdk.TransactionResponse;
import com.hedera.hashgraph.sdk.TransferTransaction;
import com.hedera.hashgraph.sdk.PublicKey;
import com.hedera.hashgraph.sdk.AccountCreateTransaction;
import com.hedera.hashgraph.sdk.Hbar;
import com.hedera.hashgraph.sdk.AccountBalanceQuery;
import com.hedera.hashgraph.sdk.AccountBalance;
import java.util.concurrent.TimeoutException;
public class HederaExamples {
public static void main(String[] args) {
//Grab your Hedera Testnet account ID and private key
AccountId myAccountId = AccountId.fromString(Dotenv.load().get("MY_ACCOUNT_ID"));+
PrivateKey myPrivateKey = PrivateKey.fromString(Dotenv.load().get("MY_PRIVATE_KEY"));
//Create your Hedera Testnet client
Client client = Client.forTestnet();
client.setOperator(myAccountId, myPrivateKey);
// Set default max transaction fee & max query payment
client.setDefaultMaxTransactionFee(new Hbar(100));
client.setMaxQueryPayment(new Hbar(50));
}
}
JavaScript
{% code title="index.js" %}
```javascript
const {
Client,
PrivateKey,
AccountCreateTransaction,
AccountBalanceQuery,
Hbar,
TransferTransaction,
} = require("@hashgraph/sdk");
require("dotenv").config();
async function environmentSetup() {
//Grab your Hedera testnet account ID and private key from your .env file
const myAccountId = process.env.MY_ACCOUNT_ID;
const myPrivateKey = process.env.MY_PRIVATE_KEY;
// If we weren't able to grab it, we should throw a new error
if (!myAccountId || !myPrivateKey) {
throw new Error(
"Environment variables MY_ACCOUNT_ID and MY_PRIVATE_KEY must be present"
);
}
//Create your Hedera Testnet client
const client = Client.forTestnet();
//Set your account as the client's operator
client.setOperator(myAccountId, myPrivateKey);
//Set the default maximum transaction fee (in Hbar)
client.setDefaultMaxTransactionFee(new Hbar(100));
//Set the maximum payment for queries (in Hbar)
client.setMaxQueryPayment(new Hbar(50));
}
environmentSetup();
```
{% endcode %}
Go
{% code title="hedera\_examples.go" %}
```go
package main
import (
"fmt"
"os"
"github.com/hashgraph/hedera-sdk-go/v2"
"github.com/joho/godotenv"
)
func main() {
//Loads the .env file and throws an error if it cannot load the variables from that file correctly
err := godotenv.Load(".env")
if err != nil {
panic(fmt.Errorf("Unable to load environment variables from .env file. Error:\n%v\n", err))
}
//Grab your testnet account ID and private key from the .env file
myAccountId, err := hedera.AccountIDFromString(os.Getenv("MY_ACCOUNT_ID"))
if err != nil {
panic(err)
}
myPrivateKey, err := hedera.PrivateKeyFromString(os.Getenv("MY_PRIVATE_KEY"))
if err != nil {
panic(err)
}
//Create your testnet client
client := hedera.ClientForTestnet()
client.SetOperator(myAccountId, myPrivateKey)
// Set default max transaction fee & max query payment
client.SetDefaultMaxTransactionFee(hedera.HbarFrom(100, hedera.HbarUnits.Hbar))
client.SetDefaultMaxQueryPayment(hedera.HbarFrom(50, hedera.HbarUnits.Hbar))
}
```
{% endcode %}
{% hint style="info" %}
Have a question? [Ask it on StackOverflow](https://stackoverflow.com/questions/tagged/hedera-hashgraph)
{% endhint %}
---
# Agent Instructions: Querying This Documentation
If you need additional information that is not directly available in this page, you can query the documentation dynamically by asking a question.
Perform an HTTP GET request on the current page URL with the `ask` query parameter:
```
GET https://dev.uniultra.xyz/docs/getting-started/environment-set-up.md?ask=
```
The question should be specific, self-contained, and written in natural language.
The response will contain a direct answer to the question and relevant excerpts and sources from the documentation.
Use this mechanism when the answer is not explicitly present in the current page, you need clarification or additional context, or you want to retrieve related documentation sections.